相关链接
coreData第一版_只有简单的StudentEntity coreData第二版_添加了ClassEntity
CoreData第一版
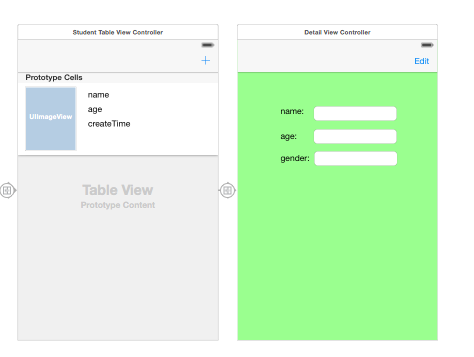
前期操作
首先创建新文件Use Core Data勾选
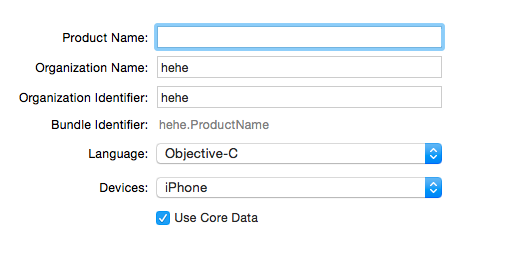
在AppDelegate中就会出现附加代码
#import <UIKit/UIKit.h>
#import <CoreData/CoreData.h>

@interface AppDelegate : UIResponder <UIApplicationDelegate>

@property (strong, nonatomic) UIWindow *window;
#pragma mark 被管理的数据上下文 作用:插入数据,查询数据,删除数据
@property (readonly, strong, nonatomic) NSManagedObjectContext *managedObjectContext;
#pragma mark 被管理的数据模型:数据库所有表格或数据结构偶,包含各种实体的定义信息 作用:添加实体的属性,建立属性之间关系
@property (readonly, strong, nonatomic) NSManagedObjectModel *managedObjectModel;
#pragma mark 持久化存储助理,相当于数据库的连接器 作用:设置数据存储的名字,位置,存储方式,和存储时机
@property (readonly, strong, nonatomic) NSPersistentStoreCoordinator *persistentStoreCoordinator;

#pragma mark 保存数据岛持久层(数据库)
- (void)saveContext;
#pragma mark 应用程序沙盒下的Documents目录路径
- (NSURL *)applicationDocumentsDirectory;

@end
AppDelegate.m中的代码不用管
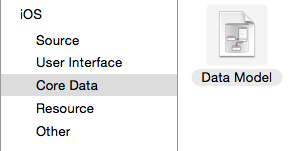
新添加Core Data_Data Model文件
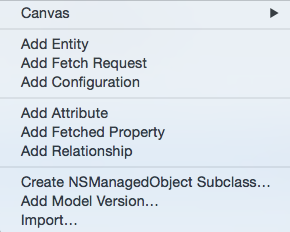
在文件中点击Add Entity,创建新的实体

对每个Entity进行赋值

选中CoreData_self.xcdatamodeld,点击Editor,点击最长的createManager….拉出实体属性

代码部分
StudentTableViewController.h中添加context和stuArray,懒加载实现
#import <UIKit/UIKit.h>

@interface StudentTableViewController : UITableViewController

#pragma mark 创建一个被管理的数据上下文,用于插入数据,查询数据,删除数据
@property (nonatomic,retain) NSManagedObjectContext *context;
#pragma mark 创建一个由实体组成的数据,用于传值
@property (nonatomic,retain) NSMutableArray *stuArray;

@end

.m中实现懒加载
#pragma mark 懒加载初始化stuArray
- (NSMutableArray *)stuArray {
    if (_stuArray == nil) {
        _stuArray = [NSMutableArray array];
    }
    return _stuArray;
}

#pragma mark 懒加载获取context
- (NSManagedObjectContext *)context {
    AppDelegate *myDelegate = (AppDelegate *)[UIApplication sharedApplication].delegate;
    if (_context == nil) {
        _context = myDelegate.managedObjectContext;
    }
    return _context;
}
实现向数据库添加的功能
#pragma mark 添加学生点击事件
- (IBAction)addStudentClick:(UIBarButtonItem *)sender {

//    创建实体描述文件_在context中有一个名字叫StudentEntity的实体
    NSEntityDescription *myEntityDes = [NSEntityDescription entityForName:@"StudentEntity" inManagedObjectContext:self.context];

//    生成一个实体_实体开辟空间,并和描述文件一起插入到context上下文中
    StudentEntity *stu = [[StudentEntity alloc] initWithEntity:myEntityDes insertIntoManagedObjectContext:_context];

//    给实体配置属性
    NSArray *names = @[@"赤",@"橙",@"黄",@"绿",@"青",@"蓝"];
    stu.name = names[arc4random() % names.count];
    stu.age = [NSNumber numberWithInteger:arc4random()%100];
    stu.gender = @"男";
    stu.creatTime = [NSDate date];

//    上下文保存_将承载有实体描述文件和实体的context同过save方法存储到数据库
    BOOL result = [_context save:nil];
    if (result) {
//        如果存储成功,则将stu实体直接赋值给实体数组,用于传值,刷新tableView
        [self.stuArray addObject:stu];
        [self.tableView reloadData];
    }
}
数据库中的查找功能
#pragma mark 查找_在显示的时候从数据库中直接调取数据,可以实现上次下线儿时的状态
- (void)viewDidLoad {
    [super viewDidLoad];

//    查找条件_根据实体名发送查找申请 fetch_查找,取得
    NSFetchRequest *request = [NSFetchRequest fetchRequestWithEntityName:@"StudentEntity"];

//    执行查找,返回结果_向context发出执行取出请求命令,从数据库中取出所有的有共同实体名的实体,组成数组
    NSArray *array = [self.context executeFetchRequest:request error:nil];

//    将取出的实体数组赋值给用于显示的stuArray,传到cell显示
    [self.stuArray addObjectsFromArray:array];
    [self.tableView reloadData];

}
改的实现
#pragma mark 修改内容
- (IBAction)saveEdit:(UIBarButtonItem *)sender {

    AppDelegate *myDelegate = (AppDelegate *)[UIApplication sharedApplication].delegate;
//    对指定位置的实体进行重新赋值
    _student.name = self.nameTextField.text;
    _student.age = [NSNumber numberWithInt:[self.ageTextField.text intValue]];
    _student.gender = self.genderTextField.text;
//    然后通过save方法,至今将新的值存进去
    [myDelegate.managedObjectContext save:nil];

}
对cell进行赋值
#pragma mark 对cell进行赋值
- (UITableViewCell *)tableView:(UITableView *)tableView cellForRowAtIndexPath:(NSIndexPath *)indexPath {
    StudentTableViewCell *cell = [tableView dequeueReusableCellWithIdentifier:@"stuCell" forIndexPath:indexPath];
//    进行传值,
    StudentEntity *stu = _stuArray[indexPath.row];
    cell.nameLabel.text = stu.name;
    cell.ageLabel.text = [NSString stringWithFormat:@"%@",stu.age];
//    description:Returns a string representation of the receiver.
    cell.createTimeLabel.text = [stu.creatTime description];
    [cell.imageView setImage:[UIImage imageNamed:@"呵呵.gif"]];

    // Configure the cell...

    return cell;
}
cell的行删除的实现
#pragma mark 可以对行进行编辑
- (BOOL)tableView:(UITableView *)tableView canEditRowAtIndexPath:(NSIndexPath *)indexPath {
    // Return NO if you do not want the specified item to be editable.
    return YES;
}

#pragma mark 编辑方式的选择
- (void)tableView:(UITableView *)tableView commitEditingStyle:(UITableViewCellEditingStyle)editingStyle forRowAtIndexPath:(NSIndexPath *)indexPath {
//    删除编辑方式
    if (editingStyle == UITableViewCellEditingStyleDelete) {
        // Delete the row from the data source

//       先通过context删除数据库中的这一行的数据
        [_context deleteObject:[_stuArray objectAtIndex:indexPath.row]];

//        再删除stuArray里对应的元素
        [_stuArray removeObjectAtIndex:indexPath.row];
        [_context save:nil];
//        删除自带方法,删除indexPath所对应的row
        [tableView deleteRowsAtIndexPaths:@[indexPath] withRowAnimation:UITableViewRowAnimationFade];
    } else if (editingStyle == UITableViewCellEditingStyleInsert) {
//        插入编辑方式
        // Create a new instance of the appropriate class, insert it into the array, and add a new row to the table view
    }
}
行移动的实现
#pragma mark 移动的实现
- (void)tableView:(UITableView *)tableView moveRowAtIndexPath:(NSIndexPath *)fromIndexPath toIndexPath:(NSIndexPath *)toIndexPath {
}

#pragma mark 可以移动
- (BOOL)tableView:(UITableView *)tableView canMoveRowAtIndexPath:(NSIndexPath *)indexPath {
    // Return NO if you do not want the item to be re-orderable.
    return YES;
}
CoreData第二版
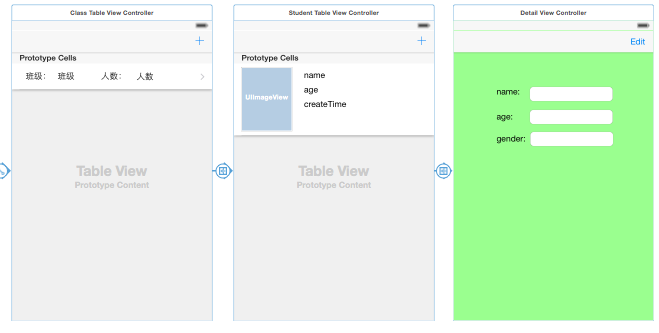
前期操作
创建新版本资料

在右侧的Model Version中添加使用最新的版本

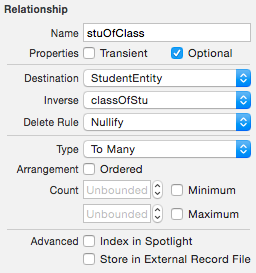
实现两个实体之间的链接,编写两个实体的Relationship内容
在ClassEntity中,设置Relationships,并与StudentEntity建立一对多得关系

在右侧的属性栏里设置Relationships,设置成To Many,一对多关系
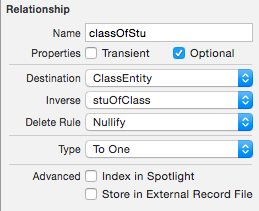
在StudentEntity中,设置Relationships

在右侧的属性栏里,设置StudentEntity的属性,To One_一对一的关系
然后将实体从新拉出来,以代码的形式显示出来


替换掉旧的代码实体
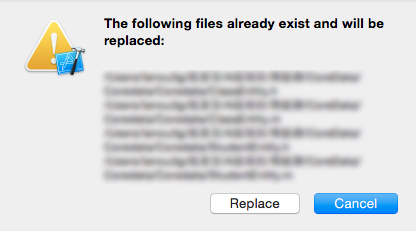
新的实体代码里有联系两者的关系代码出现,如果不出现则手动删掉代码实体,重复上边添加过程
代码部分
ClassEntity.h中有链接两个实体的方法出现
#warning 新版本有了方法
#import <Foundation/Foundation.h>
#import <CoreData/CoreData.h>

@class StudentEntity;

@interface ClassEntity : NSManagedObject

@property (nonatomic, retain) NSString * classname;
@property (nonatomic, retain) NSNumber * stucount;
@property (nonatomic, retain) NSSet *stuOfClass;
@end

@interface ClassEntity (CoreDataGeneratedAccessors)

- (void)addStuOfClassObject:(StudentEntity *)value;
- (void)removeStuOfClassObject:(StudentEntity *)value;
- (void)addStuOfClass:(NSSet *)values;
- (void)removeStuOfClass:(NSSet *)values;

@end
先在AppDlegate.m中设置添加入新版本,创建新版本的数据库,并让以后的数据都添加到新的版本中
- (NSPersistentStoreCoordinator *)persistentStoreCoordinator {
    // The persistent store coordinator for the application. This implementation creates and return a coordinator, having added the store for the application to it.
#warning 新版本添加,作用:将数据添加到新表中,不再添加到旧表中
    NSDictionary *options = @{NSMigratePersistentStoresAutomaticallyOption: [NSNumber numberWithBool:YES],NSInferMappingModelAutomaticallyOption: [NSNumber numberWithBool:YES]};

    if (_persistentStoreCoordinator != nil) {
        return _persistentStoreCoordinator;
    }

    // Create the coordinator and store

    _persistentStoreCoordinator = [[NSPersistentStoreCoordinator alloc] initWithManagedObjectModel:[self managedObjectModel]];
    NSURL *storeURL = [[self applicationDocumentsDirectory] URLByAppendingPathComponent:@"Coredata.sqlite"];
    NSError *error = nil;
    NSString *failureReason = @"There was an error creating or loading the application's saved data.";
#warning 将options添加到此
    if (![_persistentStoreCoordinator addPersistentStoreWithType:NSSQLiteStoreType configuration:nil URL:storeURL options:options error:&error]) {
        // Report any error we got.
        NSMutableDictionary *dict = [NSMutableDictionary dictionary];
        dict[NSLocalizedDescriptionKey] = @"Failed to initialize the application's saved data";
        dict[NSLocalizedFailureReasonErrorKey] = failureReason;
        dict[NSUnderlyingErrorKey] = error;
        error = [NSError errorWithDomain:@"YOUR_ERROR_DOMAIN" code:9999 userInfo:dict];
        // Replace this with code to handle the error appropriately.
        // abort() causes the application to generate a crash log and terminate. You should not use this function in a shipping application, although it may be useful during development.
        NSLog(@"Unresolved error %@, %@", error, [error userInfo]);
        abort();
    }

    return _persistentStoreCoordinator;
}
添加ClassTableViewController,实现新的页面的添加
在ClassTableViewController中添加两个属性,context和classArray,并进行懒加载
//桥梁的作用
@property (nonatomic,retain) NSManagedObjectContext *context;
//cell中传值的作用
@property (nonatomic,retain) NSMutableArray *classArray;

#pragma mark 懒加载
#warning 用self.classArray,会崩
- (NSMutableArray *)classArray {
    if (!_classArray) {
        _classArray = [NSMutableArray array];
    }
    return _classArray;
}
#warning 注意appDelegate的生成
- (NSManagedObjectContext *)context {
    AppDelegate *appDelegate = (AppDelegate *)[UIApplication sharedApplication].delegate;

    if (!_context) {
        _context = appDelegate.managedObjectContext;
    }
    return _context;
}
实现班级的添加功能
#pragma mark 添加班级点击事件
- (IBAction)addClassClick:(UIBarButtonItem *)sender {

//   创建描述文件
    NSEntityDescription *myEntity = [NSEntityDescription entityForName:@"ClassEntity" inManagedObjectContext:self.context];
//    生成一个实体
    ClassEntity *classEntity = [[ClassEntity alloc] initWithEntity:myEntity insertIntoManagedObjectContext:self.context];
//    给实体配置属性
    classEntity.classname = @"研三";
    classEntity.stucount = @48;
//    上下文保存
    BOOL result = [_context save:nil];

    if (result) {
        [self.classArray addObject:classEntity];
        [self.tableView reloadData];
    }

}
在StudentTableViewController.h中添加属性currentClass,用于push是传值
#pragma mark 添加currentClass用于push时传值
@property (nonatomic,retain) ClassEntity *currentClass;
在prepareForSegue:sender:方法中实现传值的对StudentTableViewController传值的作用
#pragma mark 实现对StudentTableViewController的传值
- (void)prepareForSegue:(UIStoryboardSegue *)segue sender:(id)sender {
    // Get the new view controller using [segue destinationViewController].
    // Pass the selected object to the new view controller.

//    根据segue来确定目标VC
    StudentTableViewController *stuVC = [segue destinationViewController];
//    对sender进行强制转换成cell
    ClassTableViewCell *cell = (ClassTableViewCell *)sender;
//    再根据cell获取当前cell的indexPath
    NSIndexPath *indexPath = [self.tableView indexPathForCell:cell];
//    根据indexPath进行传值
    stuVC.currentClass = _classArray[indexPath.row];

}
在StudentTableViewController.m中,添加学生并将学生保存到数据库的中间,设置学生添加到的班级
#pragma mark 添加学生点击事件
- (IBAction)addStudentClick:(UIBarButtonItem *)sender {

//    创建实体描述文件
    NSEntityDescription *myEntity = [NSEntityDescription entityForName:@"StudentEntity" inManagedObjectContext:self.context];
//    生成一个实体
    StudentEntity *stu = [[StudentEntity alloc] initWithEntity:myEntity insertIntoManagedObjectContext:_context];
//    给实体配置属性
    NSArray *name = @[@"小王",@"小李",@"小黄",@"小绿",@"小紫",@"小青"];
    stu.name = name[arc4random()%name.count];
    stu.age = [NSNumber numberWithInteger:arc4random() % 100];
    stu.gender = @"男";
    stu.createTime = [NSDate date];

#warning 设置添加到的班级,这样学生就背分到指定的班级下了,班级之间学生就不会相互影响了
    [stu setClassOfStu:_currentClass];
//    上下文保存
    BOOL result = [_context save:nil];
    if (result) {
        [self.stuArray addObject:stu];
        [self.tableView reloadData];
    }
}
在查找学生的过程中,加上断言和排序,这样每个班级查出来的学生就都不一样了
#pragma mark 实现查找功能
- (void)viewDidLoad {
    [super viewDidLoad];
//    查找条件
    NSFetchRequest *request = [NSFetchRequest fetchRequestWithEntityName:@"StudentEntity"];

//    根据班级查找学生,添加断言
    if (_currentClass) {
#pragma mark 断言,相当于数据库中的where,classOfStu是Relationsships中的第一个
        NSPredicate *predicate = [NSPredicate predicateWithFormat:@"classOfStu == %@",_currentClass];
//        在查找申请中添加断言(where)
        [request setPredicate:predicate];
    }

#pragma mark 添加排序,根据age排序
    NSSortDescriptor *sortDescriptor = [NSSortDescriptor sortDescriptorWithKey:@"age" ascending:YES];
//    将sortDescriptor按age排好序后转化成数组,加入申请命令
    [request setSortDescriptors:[NSArray arrayWithObject:sortDescriptor]];

//    执行查找,返回结果
    NSArray *array = [self.context executeFetchRequest:request error:nil];
//
    [self.stuArray addObjectsFromArray:array];
    [self.tableView reloadData];

}
