- 1> 创建代码仓库
- 2> 配置用户名和邮箱
- 3> 如果要一次性配置完成可以使用以下命令
- 4> 查看当前所有配置
- 5> git help //可以显示所有命令
- git 常用命令
- git 远程仓库
- git 分支管理
显示隐藏文件
$ defaults write com.apple.finder AppleShowAllFiles Yes && killall Finder
不显示隐藏文件
$ defaults write com.apple.finder AppleShowAllFiles No && killall Finder
设置隐藏单个文件
$ chflags hidden /Volumes/OS_X_EI_Capitan_file/OS_X_EI_Capitan.png
设置不隐藏文件
$ chflags nohidden /Volumes/OS_X_EI_Capitan_file/OS_X_EI_Capitan.png
1> 创建代码仓库
$ git init
2> 配置用户名和邮箱
$ git config user.name hehe
$ git config user.email hehe@163.com
以上两个命令会将用户信息保存在当前代码仓库中
只有配置了用户和邮箱后,git才能识别出操作的人员信息,通过钩子(hooks)程序可以设置一些动作例如单元测试发现问题后,自动给相关人员发送电子邮件
3> 如果要一次性配置完成可以使用以下命令
$ git config --global user.name hehe
$ git config --global user.email hehe@163.com
以上两个命令会将用户信息保存在用户目录下得 .gitconfig文件中
4> 查看当前所有配置
$ git config -l
5> git help //可以显示所有命令
| 名称 | 说明 |
|---|---|
| add | Add file contents to the index |
| bisect | Find by binary search the change that introduced a bug |
| branch | List, create, or delete branches |
| checkout | Checkout a branch or paths to the working tree |
| clone | Clone a repository into a new directory |
| commit | Record changes to the repository |
| diff | Show changes between commits, commit and working tree, etc |
| fetch | Download objects and refs from another repository |
| grep | Print lines matching a pattern |
| init | Create an empty Git repository or reinitialize an existing one |
| log | Show commit logs |
| merge | Join two or more development histories together |
| mv | Move or rename a file, a directory, or a symlink |
| pull | Fetch from and integrate with another repository or a local branch |
| push | Update remote refs along with associated objects |
| rebase | Forward-port local commits to the updated upstream head |
| reset | Reset current HEAD to the specified state |
| rm | Remove files from the working tree and from the index |
| show | Show various types of objects |
| status | Show the working tree status |
| status | Show the working tree status |
| tag | Create, list, delete or verify a tag object signed with GPG |
git help clone //显示这项命令的文档信息
文档命令: 按q退出文档 按 / 加要搜索的名字,可以实现关键字搜索 例如:/clone 空格可以实现向下翻页 Ctrl+B实现向上翻页
git 常用命令
查看当前代码库状态
git status
将文件添加到暂存区
git add main.c
将文件从暂存区添加到本地仓库
git commit main.c -m"呵呵呵呵呵"
注意: 如果没有加-m”“将会进入view文件 i 代表输入内容 输入完毕之后按esc 然后:wq
注意: git中的add和SVN中的add不同,git中的add每次修改都要添加,SVN只需要add一次
工作区 - add -> 暂存区 - commit -> 仓库
git 其他指令
注意:git默认没有简写指令 不建议使用简写指令
其别名: $ git config alias.st status $ git cofig alias.ci “commit -m”
提示: git中的版本号是一个由SHA1生成的40位的哈希值 SVN是一个递增的值
$ git reflog 查看分支引用记录

$ git reset --hard HEAD 回到当前版本,放弃所有没有提交的修改
$ git reset --hard HEAD^ 上一个版本
$ git reset --hard HEAD~(3) 回到之前第3个修订版本
配置带颜色的log别名
$ git config --global alias.lg "log --color --graph --pretty=format:'%Cred%h%Creset -%C(yellow)%d%Creset %s %Cgreen(%cr) %C(bold blue)<%an>%Creset' --abbrev-commit"
直接输入 git lg

回到指定版本号的版本
git reset --hard 版本号

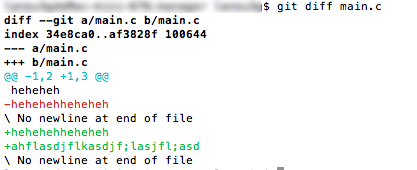
查看修改了什么内容
$ git diff 文件名

直接回到上一次提交的版本
$ git chackout main.c
git 远程仓库
1. 新建git远程仓库
git init --bare
注意: 远程仓库仅仅是用于管理代码,不参与开发
cd /Users/hehe/Desktop/git测试/公司远程仓库
git init --bare
2. 项目经理初始化项目
2.1 先克隆一份空仓库到本地
git clone /Users/hehe/Desktop/git测试/公司远程仓库
2.2 .gitignore 可以指定那些文件不纳入版本库的管理
命令行中进入与.git同级的目录
$ cd /Users/hehe/Desktop/git测试/经理/公司远程仓库
.gitignore文件
echo -e "# Xcode
> #
> # gitignore contributors: remember to update Global/Xcode.gitignore, Objective-C.gitignore & Swift.gitignore
>
> ## Build generated
> build/
> DerivedData
>
> ## Various settings
> *.pbxuser
> !default.pbxuser
-bash: !default.pbxuser: event not found
> *.mode1v3
> !default.mode1v3
-bash: !default.mode1v3: event not found
> *.mode2v3
> !default.mode2v3
-bash: !default.mode2v3: event not found
> *.perspectivev3
> !default.perspectivev3
-bash: !default.perspectivev3: event not found
> xcuserdata
>
> ## Other
> *.xccheckout
> *.moved-aside
> *.xcuserstate
> *.xcscmblueprint
>
> ## Obj-C/Swift specific
> *.hmap
> *.ipa
>
> # CocoaPods
> #
> # We recommend against adding the Pods directory to your .gitignore. However
> # you should judge for yourself, the pros and cons are mentioned at:
> # http://guides.cocoapods.org/using/using-cocoapods.html#should-i-check-the-pods-directory-into-source-control
> #
> #Pods/
>
> # Carthage
> #
> # Add this line if you want to avoid checking in source code from Carthage dependencies.
> # Carthage/Checkouts
>
> Carthage/Build"> .gitignore
进入与.git 隐藏文件同级文件,直接拷贝粘贴上面的命令行,配置好.gitignore文件
git status 发现.gitignore为红色
git add .gitignore
it commit .gitignore -m"配置忽略文件"
以上,经理文件配置完
2.3 新建项目
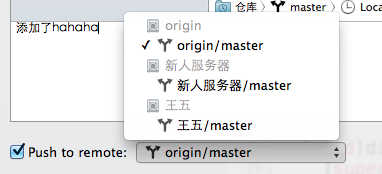
source control - > commit 将代码提交到本地 加对号可直接push
source control - > push 提交到远程服务器
git 默认就会创建一个分支,这个分支叫做origin/master,相当于SVN中的trunk
专业人员只需要在git仓库的hooks文件夹中写一些指令,就可以完成自动测试(压力测试/自动测试/集成测试/冒烟测试)
和SVN一样,如果服务器仓库的代码被修改了,我们再提交代码也会报错
fetch first == out of date
新人服务器搭建
1> 正常创建一个新人服务器 2> 将代码提交到新人服务器中
Source Control - > 仓库master - > Configure - > Remotes - > 点击+ add Remote创建服务器连接点

创建服务器连接点成功
向新服务器上传代码,在commit中直接选择路径

上传成功
新人克隆代码修改代码上传
经理新建一个代码文件,用来检查新人的代码情况
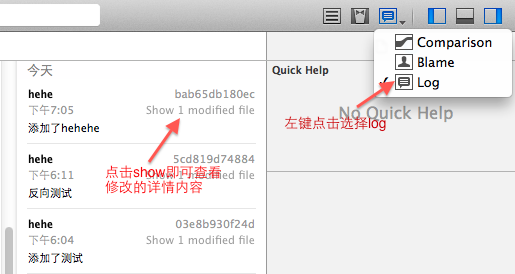
Source Control ->History查看其修改代码情况
查看修改详情

git 分支管理
git 和 SVN不同,不是拷贝一份进行备份,而是通过直接在主线上打标签做标记
查看当前标签
$ git tag
在本地代码库给项目打上标签
$ git tag -a v1.0 -m'Version 1.0'
将标签推送到远程代码库中
$ git push origin v1.0
当出现bug时,根据标签回到以前版本进行修改 使用tag,就能够将项目快速切换到某一个中间状态,例如:产品开发线上的某个版本.
迁出v1.0标签
$ git checkout v1.0
创建分支,用来处理迁出版本bug
$ git checkout -b 1.0bug.fix //要用.fix
bug修复好后再打个标签
$ git tag -a v1.1 -m'Version1.1'
推到服务器
$ git push origin v1.1
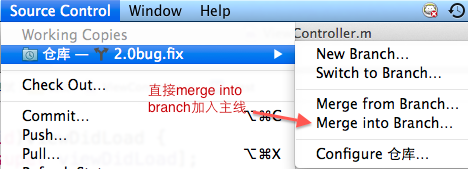
直接在修改后的文件中将分支合并到主线上

push推送到主线,完成合并
查看远程分支
$ git branch -r
删除远程分支
$ git branch -r -d origin/bugfix1.0
获取指定commit的变化
此方法支持一次拉去多个commit,需要看好再拉,想好怎么处理可能出现的冲突
$ git cherry-pick 17d5059 uerg9va 9vu38av vb9u3gv
